Difference between revisions of "Rayjet500"
From Fab Lab Bcn WIKI
(→1. PRECAUTIONS) |
(→1. PRECAUTIONS) |
||
| Line 41: | Line 41: | ||
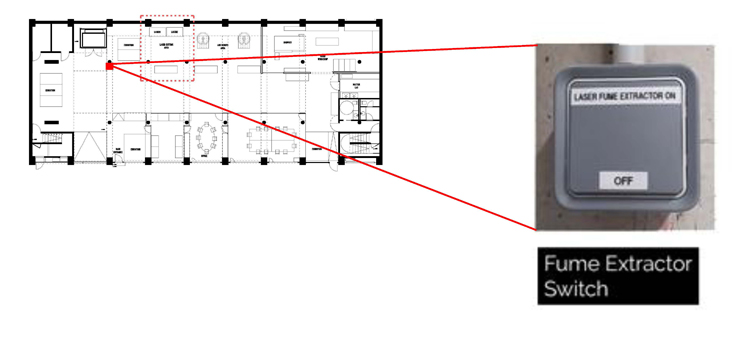
[[File:STEPS_FUME_EXTRACTOR.jpg| frame |widths="180px" heights="120px" |Turn on the main fume extractor linked to the light switch located in the column between the lift and the laser cutting area]] | [[File:STEPS_FUME_EXTRACTOR.jpg| frame |widths="180px" heights="120px" |Turn on the main fume extractor linked to the light switch located in the column between the lift and the laser cutting area]] | ||
| − | [[File:STEPS valves air pressure RAYJET500.jpg| frame |widths="180px" heights="120px" |In order to use properly the air assistance during your laser cutting work please follow the next steps]] | + | [[File:STEPS valves air pressure RAYJET500 2.jpg| frame |widths="180px" heights="120px" |In order to use properly the air assistance during your laser cutting work please follow the next steps]] |
Revision as of 13:57, 26 October 2020
Contents
Technical specifications
- Cutting area: 1300 x 900 millimeters
- Machine size: W 1870 x D 1700 x H 1110 mm
- Cutting power 60 - 120 watts
- Laser type= CO2 laser
Health & Safety
1. PRECAUTIONS
| Step | Description |
|---|---|
| 1. | If you are not going to use the computer in the Fab Lab, install the Rayjet Manager Engraver in your computer (you can reach the machine inside the Fab Lab network). |
| 2. | Turn on the main fume extractor in the big laser cutter switch panel. |
| 3. | Check that the general compressor of the building is ON. |
| 4. | Turn ON the laser cutter (right side of the machine). |
| 5. | Turn ON the red valve on the right in order to open the general air assistance. (Remember that to open the valve just positioned the RED key aligned along with the flow of the air). |
| 6. | Just turn ON the air assistance on the specific machine: Rayjet 500 |
| 7. | Turn ON the pc desktop and the monitor of the Lab connected to the laser machine. |
| 8. | Make sure the material you want to use is in the 'Materials and configuration' list. If it is not there, ask the Fab Lab responsible. |
| 9. | Measure the size of your material board. If it doesn’t fit into the board of the laser machine ask the Fab Lab responsible for cutting the correct format. |
| 10. | Please remove all your leftovers pieces after using the machines and remember to close the valve at the end of your works. Keep this small area clean and free for others to use. |
| 11. | The building is already provided by different air outlets. |
External links
Maintenance
Downloads
- See technical data sheet (PDF) [3]


