Difference between revisions of "MAI2 PUMP PICTOR 3D"
(→Technical specifications) |
|||
| (39 intermediate revisions by one user not shown) | |||
| Line 1: | Line 1: | ||
[[Category:Machines]] | [[Category:Machines]] | ||
| − | [[File: | + | [[File:4_End effector catalogue_FL_Kopie.jpg| thumb | End effector catalogue FL Kopie)]] |
==Technical Data== | ==Technical Data== | ||
| − | + | '''Total system power:''' 1,5 kW | |
| − | + | ||
| − | + | '''Power input:''' 230 V, 1Ph/N/PE/50-60Hz | |
| − | + | ||
| − | + | '''Fusing:''' 16 A | |
| − | + | ||
| − | + | '''External control 0 - 10 Vdc for rotary speed:''' optional | |
| − | + | ||
| − | + | '''Dimensions''' (LxWxH) : 720-780 x 340 x 790 mm | |
| + | |||
| + | '''Hopper capacity''' 30 Litre, 44 Litre | ||
| + | |||
| + | '''Pump outlet size''' 1" GEKA PLUS | ||
| + | |||
| + | '''Filling height:''' 75 cm | ||
| + | |||
| + | '''Total weight:''' 33 kg | ||
==Health & Safety== | ==Health & Safety== | ||
| − | |||
| − | - | + | - Always use safety glass while disconnecting the hose. |
| − | - | + | - Never run the machine dry, at least water is needed to operate the pump otherwise damage may occur. |
| − | - | + | - Never let the material fall below the minimum material level and always keep the screw under the material. |
| − | - | + | - Never disconnect the hose when there is any pressure in the pressure gauge. |
| − | + | ==Machine Views== | |
| − | + | [[File:View.jpg| 700 × 402 pixels]]<br><br> | |
| − | |||
| − | + | 1- Motor | |
| − | + | 2- Control system: Frequency converter with switch | |
| − | + | elements, power supply inlet plug with undervoltage | |
| − | + | release to prevent re-start in case of voltage interuption | |
| − | + | ||
| − | + | 3- Hopper for wet premixed material | |
| − | + | ||
| − | + | ||
| − | + | ||
| − | + | ||
| − | + | ||
| − | + | ||
| − | + | 4- Housing with polyurethan inlet | |
| − | + | ||
| − | + | ||
| − | + | ||
| − | + | 5- Worm pump | |
| − | + | ||
| − | + | ||
| − | + | ||
| − | + | 6- Pump outlet with pressure gauge | |
| − | + | ||
| − | + | ||
| − | + | ||
| − | + | ==Operating the machine== | |
| − | |||
| − | + | '''Connections Before Start-Up''' | |
| − | + | ||
| − | + | ||
| − | + | ||
| − | + | ||
| − | + | Connect the main power plug to the control cabinet | |
| − | + | with the cable to the construction 230V/1/N/PE/50Hz | |
| − | + | (3x1,5mm2). | |
| − | + | ||
| − | + | ||
| − | + | ||
| − | + | ||
| + | Make sure that all cables and safety devices are functioning properly. | ||
| − | + | '''Start-up in manual mode''' | |
| − | + | ||
| − | + | ||
| − | + | - Before Operating the machine check the machine state. Switch rightwards for manual mode. | |
| + | |||
| + | [[File:2_MAI_2PUMP_PICTOR_3D_B_Kopie.jpg| 700 × 402 pixels]]<br><br> | ||
| + | |||
| + | |||
| + | - '''Step 1:''' Turn on the main switch | ||
| + | |||
| + | [[File:Onn_n_off_switch.jpg| 700 × 402 pixels]]<br><br> | ||
| + | |||
| + | |||
| + | - '''Step 2:''' Fill the material-hopper with wet premixed material. | ||
| + | |||
| + | - '''Step 3:''' Turn the Forward/Reverse Switch to FWD (Start the machine by turning the mode switch from | ||
| + | 0 to FWD) | ||
| + | |||
| + | [[File:Speed_controlle.jpg| 700 × 402 pixels]]<br><br> | ||
| + | |||
| + | |||
| + | - '''Step 4:''' Turn the Speed control to the desired speed | ||
| + | |||
| + | |||
| + | '''Stopping the pump:''' | ||
| + | |||
| + | - '''Step 1:''' Turn the Forward/Reverse control to 0 | ||
| + | |||
| + | - '''Step 2:''' Turn off the main switch | ||
| + | |||
| + | ==Termination of work and cleaning== | ||
| + | |||
| + | After work is completed or in the event of longer inter- | ||
| + | ruptions, run the machine until the material hopper is empty. | ||
| + | |||
| + | |||
| + | '''Step 1:''' Wash the hopper with clean water, rub the hopper with the sponge provided if it is necessary | ||
| + | |||
| + | '''Important:''' | ||
| + | |||
| + | Never use any cutter or any sharp/rough tools to clean the hopper, always use the rubber tool that is provided. | ||
| + | |||
| + | '''Step 3:''' Soak a sponge ball in water. | ||
| + | |||
| + | '''Warning!''' | ||
| + | |||
| + | Never disconnect the hose when there is any pressure in the pressure gauge. Remove the remaining pressure gauge reaches 0. | ||
| + | |||
| + | |||
| + | '''Step 4:''' Open the hose coupling, insert the sponge ball into the hose. | ||
| + | |||
| + | '''Step 5:''' Reconnect the hose coupling | ||
| + | |||
| + | '''Step 6:''' Start pumping and wait for the sponge ball to come out of the hose. | ||
| + | |||
| + | '''Step 7:''' Grease the pump after cleaning to ensure the pump gasket is residue free. | ||
| + | |||
| + | '''Step 8:''' Ensure that the grease is pushed out of the pump gasket. | ||
| + | |||
| + | '''Warning!''' | ||
| + | |||
| + | Never disconnect the hose when there is any pressure in the pressure gauge. Remove the remaining pressure gauge reaches 0. | ||
| + | |||
| + | |||
| + | If the machine is not required for a longer period, dismantle the rotor | ||
| + | and stator and lubricate them with | ||
| + | slide spray. Reassemble the | ||
| + | components and put them into the | ||
| + | machine again. | ||
| + | |||
| + | ==Troubleshooting== | ||
| + | |||
| + | '''Pump not starting:''' | ||
| + | |||
| + | - Ensure that the remote control plug is properly installed. | ||
| + | |||
| + | [[File:Troubleshoot.jpg| 700 × 402 pixels]]<br><br> | ||
| + | |||
| + | |||
| + | '''Pump Choke:''' | ||
| + | |||
| + | During a choke, you will see: | ||
| + | |||
| + | - The pressure gauge needle moves to the top and the end | ||
| + | |||
| + | - The material is not coming out of the pump | ||
| + | |||
| + | |||
| + | '''Step1:''' Immediately stop the pump. | ||
| + | |||
| + | '''Step2 :''' Reverse the pump to reduce the pressure until the pressure gauge reaches 0. | ||
| + | |||
| + | |||
| + | '''WARNINGS:''' | ||
| + | |||
| + | Never disconnect the hose when there is any pressure in the pressure gauge. Remove the remaining pressure by using the reverse function until the pressure gauge reaches 0. | ||
| + | |||
| + | |||
| + | '''Step3 :''' Remove the hose coupling | ||
| + | |||
| + | '''Step4 :''' Check the pump by pumping without the hose, if | ||
| + | |||
| + | 1. The material comes out, the there is no problem with the pump. | ||
| + | |||
| + | 2. The material does not come out, remove the rotor from the stator, clean thoroughly and reinstall. | ||
| + | |||
| + | |||
| + | '''Step 5 :''' Clean the hose by removing all the material residue, ensure that everything is out of the hose. | ||
| + | |||
| + | '''Step 6 :''' Reconnect the hose and resume operation. | ||
| + | |||
| + | ==Interruptions and Down Time== | ||
| + | |||
| + | |||
| + | Interruptions at work that last longer than 30 minutes | ||
| + | should be avoided at all costs because the material in | ||
| + | the mortar hose and in the spray gun can start to | ||
| + | harden and even set under certain circumstances. | ||
| + | |||
| + | Starting the machine in this case would cause a break- | ||
| + | down and a considerable amount of cleaning. | ||
| + | |||
| + | ==Assembly & Disassembly== | ||
| + | |||
| + | https://www.youtube.com/watch?v=M37Ly_2Lvmk | ||
==Maintenance== | ==Maintenance== | ||
| + | |||
| + | Ensure that the motor housing surface and the fan cowl | ||
| + | guards are always kept clean so that dust and dirt do | ||
| + | not impair the motor output. | ||
| + | If the motor has become wet, dry it before starting and | ||
| + | have the insulation checked by a technician. | ||
| + | |||
| + | Change the grease on the main motor gears after a | ||
| + | maximum of 10.000 operating hours or 3 years at the | ||
| + | latest. | ||
| + | |||
| + | Motor: Grease ARALUB FDP 00 grease for gears | ||
| + | Regularly check that wearing parts, such as delivery | ||
| + | screw, sealing of motor coupling, PU hopper and | ||
| + | worm pump are in good condition and dimensionally | ||
| + | true, as the function of the machine, the actual delivery | ||
| + | rate and the attainable maximum pressure all depend | ||
| + | on the condition of these components. | ||
| + | |||
| + | If this parts are in good condition and dimensionally | ||
| + | true, as the function of the machine, the actual delivery | ||
| + | rate and the attainable maximum pressure all depend | ||
| + | on the condition of these components. | ||
| + | The following maintenance work has to be carried out | ||
| + | daily: | ||
| + | |||
| + | -lubricate all threads and keep them clean | ||
| + | |||
| + | - spray pump lubricant on stator and rotor | ||
| + | |||
| + | The mechanical and electrical condition of the ma- | ||
| + | chine must be inspected by a qualified personnel at | ||
| + | least once a year. | ||
| + | |||
| + | ==Links== | ||
| + | '''Control, Operation, Cleaning & Troubleshooting''' | ||
| + | https://www.youtube.com/watch?v=9-psV02YAlg | ||
| + | |||
==Downloads== | ==Downloads== | ||
| − | Manual: | + | '''User Manual:''' |
| + | |||
| + | https://drive.google.com/drive/u/0/folders/1Pn8fTXl6SLlbNm3qTAdDg95OrNsrwmP7 | ||
| + | |||
| + | '''Spare parts list:''' | ||
| − | https:// | + | https://drive.google.com/drive/u/0/folders/1Pn8fTXl6SLlbNm3qTAdDg95OrNsrwmP7 |
Latest revision as of 16:25, 26 June 2023
Contents
Technical Data
Total system power: 1,5 kW
Power input: 230 V, 1Ph/N/PE/50-60Hz
Fusing: 16 A
External control 0 - 10 Vdc for rotary speed: optional
Dimensions (LxWxH) : 720-780 x 340 x 790 mm
Hopper capacity 30 Litre, 44 Litre
Pump outlet size 1" GEKA PLUS
Filling height: 75 cm
Total weight: 33 kg
Health & Safety
- Always use safety glass while disconnecting the hose.
- Never run the machine dry, at least water is needed to operate the pump otherwise damage may occur.
- Never let the material fall below the minimum material level and always keep the screw under the material.
- Never disconnect the hose when there is any pressure in the pressure gauge.
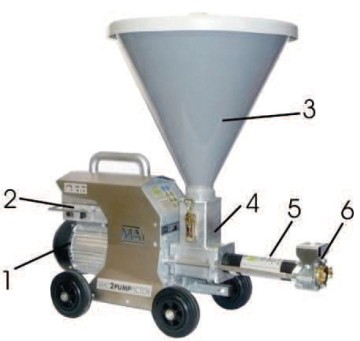
Machine Views
1- Motor
2- Control system: Frequency converter with switch elements, power supply inlet plug with undervoltage release to prevent re-start in case of voltage interuption
3- Hopper for wet premixed material
4- Housing with polyurethan inlet
5- Worm pump
6- Pump outlet with pressure gauge
Operating the machine
Connections Before Start-Up
Connect the main power plug to the control cabinet with the cable to the construction 230V/1/N/PE/50Hz (3x1,5mm2).
Make sure that all cables and safety devices are functioning properly.
Start-up in manual mode
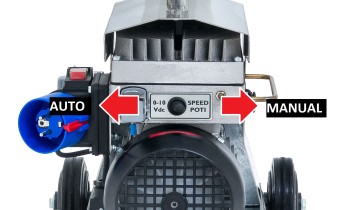
- Before Operating the machine check the machine state. Switch rightwards for manual mode.
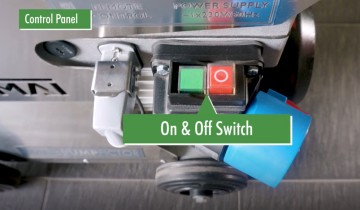
- Step 1: Turn on the main switch
- Step 2: Fill the material-hopper with wet premixed material.
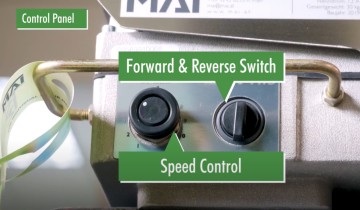
- Step 3: Turn the Forward/Reverse Switch to FWD (Start the machine by turning the mode switch from 0 to FWD)
- Step 4: Turn the Speed control to the desired speed
Stopping the pump:
- Step 1: Turn the Forward/Reverse control to 0
- Step 2: Turn off the main switch
Termination of work and cleaning
After work is completed or in the event of longer inter- ruptions, run the machine until the material hopper is empty.
Step 1: Wash the hopper with clean water, rub the hopper with the sponge provided if it is necessary
Important:
Never use any cutter or any sharp/rough tools to clean the hopper, always use the rubber tool that is provided.
Step 3: Soak a sponge ball in water.
Warning!
Never disconnect the hose when there is any pressure in the pressure gauge. Remove the remaining pressure gauge reaches 0.
Step 4: Open the hose coupling, insert the sponge ball into the hose.
Step 5: Reconnect the hose coupling
Step 6: Start pumping and wait for the sponge ball to come out of the hose.
Step 7: Grease the pump after cleaning to ensure the pump gasket is residue free.
Step 8: Ensure that the grease is pushed out of the pump gasket.
Warning!
Never disconnect the hose when there is any pressure in the pressure gauge. Remove the remaining pressure gauge reaches 0.
If the machine is not required for a longer period, dismantle the rotor
and stator and lubricate them with
slide spray. Reassemble the
components and put them into the
machine again.
Troubleshooting
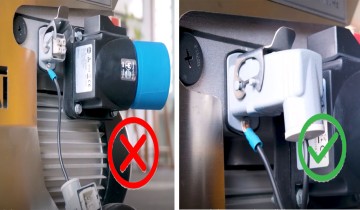
Pump not starting:
- Ensure that the remote control plug is properly installed.
Pump Choke:
During a choke, you will see:
- The pressure gauge needle moves to the top and the end
- The material is not coming out of the pump
Step1: Immediately stop the pump.
Step2 : Reverse the pump to reduce the pressure until the pressure gauge reaches 0.
WARNINGS:
Never disconnect the hose when there is any pressure in the pressure gauge. Remove the remaining pressure by using the reverse function until the pressure gauge reaches 0.
Step3 : Remove the hose coupling
Step4 : Check the pump by pumping without the hose, if
1. The material comes out, the there is no problem with the pump.
2. The material does not come out, remove the rotor from the stator, clean thoroughly and reinstall.
Step 5 : Clean the hose by removing all the material residue, ensure that everything is out of the hose.
Step 6 : Reconnect the hose and resume operation.
Interruptions and Down Time
Interruptions at work that last longer than 30 minutes should be avoided at all costs because the material in the mortar hose and in the spray gun can start to harden and even set under certain circumstances.
Starting the machine in this case would cause a break- down and a considerable amount of cleaning.
Assembly & Disassembly
https://www.youtube.com/watch?v=M37Ly_2Lvmk
Maintenance
Ensure that the motor housing surface and the fan cowl guards are always kept clean so that dust and dirt do not impair the motor output. If the motor has become wet, dry it before starting and have the insulation checked by a technician.
Change the grease on the main motor gears after a maximum of 10.000 operating hours or 3 years at the latest.
Motor: Grease ARALUB FDP 00 grease for gears Regularly check that wearing parts, such as delivery screw, sealing of motor coupling, PU hopper and worm pump are in good condition and dimensionally true, as the function of the machine, the actual delivery rate and the attainable maximum pressure all depend on the condition of these components.
If this parts are in good condition and dimensionally true, as the function of the machine, the actual delivery rate and the attainable maximum pressure all depend on the condition of these components. The following maintenance work has to be carried out daily:
-lubricate all threads and keep them clean
- spray pump lubricant on stator and rotor
The mechanical and electrical condition of the ma- chine must be inspected by a qualified personnel at least once a year.
Links
Control, Operation, Cleaning & Troubleshooting https://www.youtube.com/watch?v=9-psV02YAlg
Downloads
User Manual:
https://drive.google.com/drive/u/0/folders/1Pn8fTXl6SLlbNm3qTAdDg95OrNsrwmP7
Spare parts list:
https://drive.google.com/drive/u/0/folders/1Pn8fTXl6SLlbNm3qTAdDg95OrNsrwmP7
