


Difference between revisions of "Formbytes"

From Fab Lab Bcn WIKI
Jump to: navigation, search
(Website)
 
(17 intermediate revisions by 3 users not shown)
Line 1: Line 1:
 +
== Formbytes One ==
 +
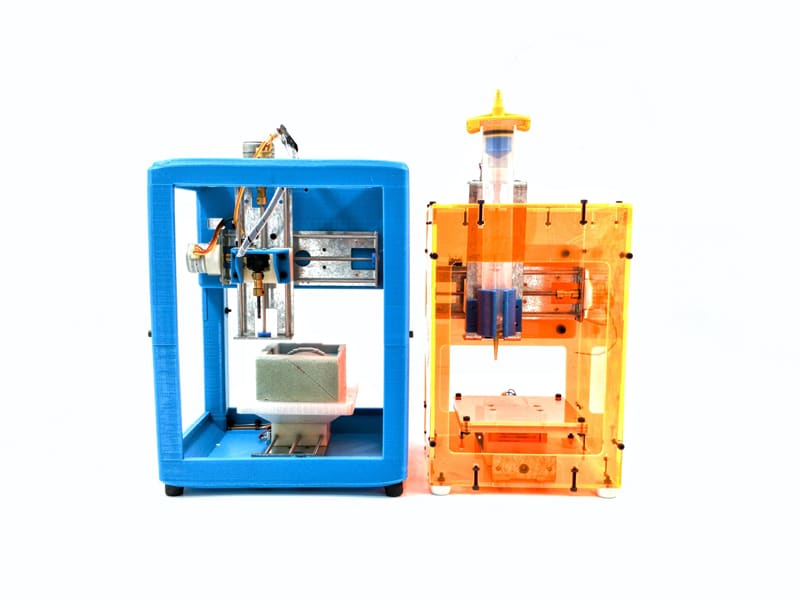
FormBytes One is  a professional-quality 3D printer sold in a kit easy to assemble.
 +
It is available in a fun and attractive range of colors to choose from.
  
== Formbytes ==
+
[[Category:Machines]]
This page is dedicated to specific details about the 3d-printer model "Formbytes".
+
  
[[Category:Old Machines]]
 
 
[[File:formbytes_full_view.JPG| thumb |Formbytes]]
 
[[File:formbytes_info_screen.JPG| thumb |Formbytes]]
 
[[File:formbytes_prepare.JPG| thumb |Formbytes]]
 
[[File:formbytes_move_0point1_mm.jpg| thumb |Formbytes]]
 
[[File:formbytes_move_axis.jpg| thumb |Formbytes]]
 
[[File:formbytes_preheat_pla.jpg| thumb |Formbytes]]
 
[[File:formbytes_print_from_sd.JPG| thumb |Formbytes]]
 
[[File:formbytes_progress_31degrees.JPG| thumb |Formbytes]]
 
[[File:formbytes_progress_35degrees.JPG| thumb |Formbytes]]
 
[[File:formbytes_important_instruction.JPG]| thumb |Formbytes]
 
[[File:formbytes_extruder.JPG]| thumb |Formbytes]
 
[[File:formbytes_extruder_use.JPG]| thumb |Formbytes]
 
[[File:formbytes_disable_steppers.JPG]| thumb |Formbytes]
 
 
==Precaution==
 
 
* '''Never leave the laser device unattended while the system is operating.'''
 
* Always have a fire extinguisher available, as the laser beam can ignite flammable materials.
 
* Do not put any flammanle materials in the inside of the device or in the immediate surroundings of the device.
 
* Be aware of all Laser safety stickers on the machine and follow them.
 
* The system must be used only by authorized and trained personnel.
 
* Avoid electrostatic charging during cable connections / plug-in.
 
* Do not start the Laser machine without an adequate exhaust system.
 
* In case of a broken lens: avoid direct skin contact and inhaling.
 
* "EMERGENCY-STOP": on any risk: LIFT THE COVER LID!
 
<br>
 
[http://wiki.fablabbcn.org/Material_laser Material Laser Cut]
 
<br>
 
<br>
 
==Procedures on the softwares==
 
===Rhino===
 
====Geometry====
 
* Join the geometry
 
[[File:Join.jpg| 700 × 402 pixels]]<br><br>
 
* Check the scale of the drawing , make sure you are in millimeters and that your material fits in the laser.
 
[[File:Scale.jpg| 700 × 402 pixels]]<br><br>
 
* Seldup command selects duplicate lines. Keep in mind that is there are more than one lines the laser cutter will pass more times over the same place.
 
[[File:3SelDup.jpg| 700 × 402 pixels]]<br><br>
 
* Make2d if you import your drawing from other programs other than rhino and to make sure that everything is on 0 in Z plane.
 
[[File:4Make2D.jpg| 700 × 402 pixels]]<br><br>
 
* Change object layer : hairline
 
[[File:Hairline.jpg| 500 × 202 pixels]]<br><br>
 
[[File:4LayersColour.jpg| 700 × 402 pixels]]<br><br>
 
{| class="wikitable"
 
|-valign="top"
 
|[[File:4ColourSelection.jpg| 700 × 402 pixels]]
 
|<br>Engrave <br>Cut<br>Cut<br>Cut<br>Cut<br>Cut<br>Cut<br>Cut<br>Cut<br>Cut<br>Cut<br>Cut<br>Cut<br>Cut<br>Cut<br>Cut<br>Cut<br>Cut<br>Cut
 
|}
 
<br>
 
 
====Printing====
 
* Ctrl+p : Print
 
[[File:4WindowPrint.jpg| 4WindowsPrint ]]<br><br>
 
* Properties
 
[[File:5Print.jpg| 700 × 402 pixels]]<br><br>
 
[[File:5Preference.jpg| 700 × 402 pixels]]<br><br>
 
* Material Database
 
[[File:5MaterialDataBase.jpg|Material]]<br><br>
 
*Process options
 
[[File:5Process options.jpg|Process options]]<br><br>
 
[[File:5Valid.jpg|Valid]]<br><br>
 
* Set the view
 
[[File:Settheview.jpg|Set the view]]<br><br>
 
* Drag the square to define your print window
 
[[File:PrintWindow.jpg|Print Window]]<br><br>
 
* Press enter and once you come back to the previous screen clic on print.
 
<br>
 
===Job control===
 
[http://www.troteclaser.com/en-US/Support/Documents/JobControl-Manual-EN.pdf JobControl Manual]
 
<br>
 
* Selection of your file
 
[[File:Selection.jpg|Selection]]<br><br>
 
 
<br><br><br>
 
 
==The Machine : Trotec Speedy 400==
 
[http://www.troteclaser.com/en-US/Support/Documents/Speedy-300-Manual-EN.pdf Operation Manual]
 
 
===Characteristics===
 
===Characteristics===
 
{| class="wikitable"
 
{| class="wikitable"
 +
|
 +
! FormBytes One v1 (2015)
 +
! FormBytes One v2 (2016)
 
|-
 
|-
 
| Overall dimensions (W x D x H)
 
| Overall dimensions (W x D x H)
| 1400 * 950 * 1070 mm
+
| Approx. 28 * 31 * 43 mm
 +
| Approx. 28 * 31 * 43 mm
 
|-
 
|-
| Working area
+
| Printing Area
| 1000 * 610 mm
+
| 150*150*100 mm
 +
| 150*150*100 mm
 
|-
 
|-
 
| Max. height of workpiece
 
| Max. height of workpiece
| 305 mm
+
| 100 mm
 +
| 100 mm
 
|-
 
|-
 
| Max. processing speed
 
| Max. processing speed
| 355 cm / second, acceleration 4g
+
| ? cm / second, acceleration ?g
 +
| ? cm / second, acceleration ?g
 +
|-
 +
|Resolution
 +
| 0.1 mm
 +
| 0.1 mm
 
|-
 
|-
 
| Accuracy
 
| Accuracy
| Addressable accuracy: 5 microm<br> Static repeat accuracy: < +/- 15microm
+
| Addressable accuracy: ? microm<br> Static repeat accuracy: < +/- ?microm
|-
+
| Addressable accuracy: ? microm<br> Static repeat accuracy: < +/- ?microm
| Mechanical design
+
| Fully enclosed chassis with double safety interlock system laser safety class, <br>CE coñpliant maintenance-free, brushless DC servo motors<br>InPack-Technology
+
|-
+
| Laser Design
+
| Sealed-Off CO2 laser<br> from 40 - 120 Watt
+
 
|-
 
|-
 
| Weight
 
| Weight
| Approx. 300kg (depending on laser power)
+
| Approx. ?kg
 +
| Approx. ?kg
 
|}
 
|}
  
===Accessories===
+
===Precaution===
* Focus Tool
+
* Unplug electricity if not in use
* Cone
+
* never leave hotend heated when machine is not in use
* Allen Key set 1.5 - 10mm
+
* [http://www.buletinsamsung.com/harga-galaxy-note Daftar Harga Samsung Galaxy Note]
* 2 Wrenches
+
* Lens cleaning tissues
+
* Optics cleaning tissues
+
* AC power cord
+
  
 +
===Turning on the machine===
 +
*
 +
*
  
===The lens===
+
==Recommended Software==
{| class="wikitable"
+
|-
+
! Colours
+
! Focal (mm)
+
! Thickness material Used
+
|-
+
| Red
+
| 1.5
+
| Very fine
+
|-
+
| Black
+
| 2
+
| Used mainly
+
|-
+
| Pink
+
| 2.5
+
| Thick
+
|}
+
[http://www.troteclaser.com/en-US/Laser-Machines/Accessories/Options/Pages/Focus-Lenses.aspx Focus Lenses for Trotec Laser Machines]
+
  
===Cleaning optics===
+
===CURA===
*Do not touch directly the lens during the operation.
+
====Installation====
*Pour on it a drop of the specific product : "Lens clens".
+
*Clean it with the appropriate electrostatic tissues : "Edmund Industrial Optic".
+
  
===Vacuum===
+
[[File:Cura01_first_time_run_wizard.PNG|border|350px]] [[File:Cura02_select_your_machine.PNG|border|350px]] [[File:Cura07_other_machine_information.PNG|border|350px]] 
+
*First download the program [https://ultimaker.com/en/products/cura-software here], proceed to open the downloaded installer. Select your language and hit "Next". Now tick the option "Other" and hit "Next". Now tick the option "Custom..." and hit "Next".
{| class="wikitable"
+
[[File:Cura08_custom_reprap_information.PNG|border|350px]] [[File:Cura04_open_profile.PNG|border|350px]]
|-
+
*Enter the settings like displayed in the image above and hit "Finish".Cura should open itself imediately. What is left to do is configurating. First change the layer weight from 0.3 to 0.2. Now hover with your mouse over "File" and select "Open Profile". Now search for the "formbytes_standard.ini". depending on where you saved it, you should find it rather easily. In case you have not downloaded this file yet, you can download it here: [[File:Formbytes_standard.zip]]. Open the file and Cura should be configurated.
| Accrylic
+
 
| Not Compress Air
+
===FreeCAD===
|-
+
 
| Rubber
+
[http://www.freecadweb.org/wiki/index.php?title=Download FreeCAD - OpenSource Parametric Modelling Software]
| Compress Air
+
[http://www.kameraku.co/harga-kamera-canon Kamera Canon Best Seller]
|-
+
 
| Wood
+
==Printing a modell==
| Compress Air
+
===CURA Preparation===
|}
+
Make  sure you have a SD card with enough memory left connected to your computer.
 +
Open Cura.
 +
Delete the ultimaker robot.
 +
Now hover with your mouse over "File" in the upper lefthand corner and select "Load model file" (Shortcut: CTRL+L). Search for the file you chose to print and open it. A icon labeled "toolpath to SD" should appear on the screen. Click it. Eject the SD card and connect it to the Formbytes One. 
 +
 
 +
 
 +
 
 +
===Formbytes One Preparation===
 +
 
 +
 
 +
[[File:formbytes11_turn_on.JPG|border|250px]]  [[File:formbytes16_sd_card_slot.JPG|border|250px]]  [[File:formbytes12_push tha_button.JPG|border|250px]]  [[File:formbytes13_push_prepare.JPG|border|250px]] 
 +
*Plug in the power cable. Inject the SD card into the slot on the left side. Now press the scroll on the bottom right. Now select "Prepare".
 +
[[File:formbytes14_push_preheat_pla.JPG|border|250px]]  [[File:formbytes15_preheating.JPG|border|250px]]  [[File:Formbytes_print_from_sd.JPG|border|250px]]  [[File:formbytes17_printing.JPG|border|250px]]   
 +
*Select "Preheat PLA". The Printer is now preheating. The current temperature visible directly above the coordinates should adjust to the ideal value visible on the top left of the screen. When the current temperature is synced to the ideal temperature press the scroll once again. Now select "Print from SD". A list of your files should be displayed now. Select your file which is usually at the bottom. The 3D printer should start to print your model.
 +
 
 +
 
 +
Formbytes move 0point1 mm.JPG
 +
 
 +
Formbytes_extruder_use.JPG
 +
Formbytes_disable_steppers.JPG
 +
Formbytes_prepare.JPG
 +
Formbytes_extruder.JPG
 +
Formbytes back to info screen.JPG
 +
Formbytes_move_axis.JPG
 +
Formbytes_progress_31degrees.JPG
 +
Formbytes_preheat_pla.JPG
 +
 
 +
 
 +
 
 +
 
 +
 
 +
 
 +
 
 +
 
 +
 
 +
[[File:formbytes_important_instruction.JPG|border|100px|It is important to store the ABS plastic cable coil like this.]]
 +
[[File:Cura03_ultimaker2.PNG|100px]]
 +
 
 +
==Website==
  
===Turn on the machine===
+
[http://www.formbytes.com/ Formbytes]
* Turn the key.
+
[http://www.buletinac.com/harga-ac-panasonic/ AC Hemat Panasonic]
* Clean and insert the lens in the laser head : the curved portion above.
+
* Move the head with the arrows on the machine.
+
* Use the focus for positionning the table.
+
* When the lid is closed, a light flashes at a reduced frequency.
+
* Turn on the vacuum, if it is necessary.
+
* On "Job control", connect the machine and align your document with the target thanks the following commands :
+
[[File:7tool.jpg|tool]]
+
* Then, play.
+

Latest revision as of 05:28, 31 January 2017

Formbytes One

FormBytes One is a professional-quality 3D printer sold in a kit easy to assemble. It is available in a fun and attractive range of colors to choose from.

Characteristics

FormBytes One v1 (2015) FormBytes One v2 (2016)
Overall dimensions (W x D x H) Approx. 28 * 31 * 43 mm Approx. 28 * 31 * 43 mm
Printing Area 150*150*100 mm 150*150*100 mm
Max. height of workpiece 100 mm 100 mm
Max. processing speed  ? cm / second, acceleration ?g  ? cm / second, acceleration ?g
Resolution 0.1 mm 0.1 mm
Accuracy Addressable accuracy: ? microm
Static repeat accuracy: < +/- ?microm
Addressable accuracy: ? microm
Static repeat accuracy: < +/- ?microm
Weight Approx. ?kg Approx. ?kg

Precaution

Turning on the machine

Recommended Software

CURA

Installation

Cura01 first time run wizard.PNG Cura02 select your machine.PNG Cura07 other machine information.PNG  
  • First download the program here, proceed to open the downloaded installer. Select your language and hit "Next". Now tick the option "Other" and hit "Next". Now tick the option "Custom..." and hit "Next".
Cura08 custom reprap information.PNG Cura04 open profile.PNG
  • Enter the settings like displayed in the image above and hit "Finish".Cura should open itself imediately. What is left to do is configurating. First change the layer weight from 0.3 to 0.2. Now hover with your mouse over "File" and select "Open Profile". Now search for the "formbytes_standard.ini". depending on where you saved it, you should find it rather easily. In case you have not downloaded this file yet, you can download it here: File:Formbytes standard.zip. Open the file and Cura should be configurated.

FreeCAD

FreeCAD - OpenSource Parametric Modelling Software Kamera Canon Best Seller

Printing a modell

CURA Preparation

Make sure you have a SD card with enough memory left connected to your computer. Open Cura. Delete the ultimaker robot. Now hover with your mouse over "File" in the upper lefthand corner and select "Load model file" (Shortcut: CTRL+L). Search for the file you chose to print and open it. A icon labeled "toolpath to SD" should appear on the screen. Click it. Eject the SD card and connect it to the Formbytes One.


Formbytes One Preparation

Formbytes11 turn on.JPG  Formbytes16 sd card slot.JPG  Formbytes12 push tha button.JPG  Formbytes13 push prepare.JPG  
  • Plug in the power cable. Inject the SD card into the slot on the left side. Now press the scroll on the bottom right. Now select "Prepare".
Formbytes14 push preheat pla.JPG  Formbytes15 preheating.JPG  Formbytes print from sd.JPG   Formbytes17 printing.JPG     
  • Select "Preheat PLA". The Printer is now preheating. The current temperature visible directly above the coordinates should adjust to the ideal value visible on the top left of the screen. When the current temperature is synced to the ideal temperature press the scroll once again. Now select "Print from SD". A list of your files should be displayed now. Select your file which is usually at the bottom. The 3D printer should start to print your model.


Formbytes move 0point1 mm.JPG

Formbytes_extruder_use.JPG Formbytes_disable_steppers.JPG Formbytes_prepare.JPG Formbytes_extruder.JPG Formbytes back to info screen.JPG Formbytes_move_axis.JPG Formbytes_progress_31degrees.JPG Formbytes_preheat_pla.JPG


It is important to store the ABS plastic cable coil like this. Cura03 ultimaker2.PNG

Website

Formbytes AC Hemat Panasonic