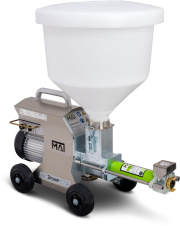
Difference between revisions of "MAI2 PUMP PICTOR 3D"
(→Operating the machine) |
(→Operating the machine) |
||
| Line 31: | Line 31: | ||
- '''Step 1:''' Turn on the main switch | - '''Step 1:''' Turn on the main switch | ||
| − | |||
- '''Step 2:''' Pour the mixed material into the hopper | - '''Step 2:''' Pour the mixed material into the hopper | ||
Revision as of 19:02, 19 April 2023
Contents
Technical Data
- Operating voltage: 230V/1/N/PE/50Hz
- Nominal power: 1,5 kW
- Fusing: 16 A
- Delivery rate:
- Worm pump 24L 0S: 1,5 to 9,5 l/min infinitely adjustable
- Worm pump 10L 0S: 0,6 to 4,0 l/min infinitely adjustable
- L x W x H: 75 x 34 x 43 cm
- Filling height: 75 cm
- Total weight: 33 kg
Health & Safety
- Never run the machine dry, at least water is needed to operate the pump otherwise damage may occur.
- Never let the material fall below the minimum material level and always keep the screw under the material.
- Never disconnect the hose when there is any pressure in the pressure gauge.
Operating the machine
Using the pump
- Step 1: Turn on the main switch
- Step 2: Pour the mixed material into the hopper
- Step 3: Turn the Forward/Reverse Switch to FWD
- Step 4: Turn the Speed control to the desired speed
Stopping the pump:
- Step 1: Turn the Forward/Reverse control to 0
- Step 2: Turn off the main switch
Cleaning the machine
Step 1: Wash the hopper with clean water, rub the hopper if it is necessary
Important:
Never use any cutter or any sharp/rough tools to clean the hopper, always use the rubber tool that is provided.
Step 3: Soak a sponge ball in water.
Warning!
Never disconnect the hose when there is any pressure in the pressure gauge. Remove the remaining pressure gauge reaches 0.
Step 4: Open the hose coupling, insert the sponge ball into the hose.
Step 5: Reconnect the hose coupling
Step 6: Start pumping and wait for the sponge ball to come out of the hose.
Step 7: Grease the pump after cleaning to ensure the pump gasket is residue free.
Step 8: Ensure that the grease is pushed out of the pump gasket.
Warning!
Never disconnect the hose when there is any pressure in the pressure gauge. Remove the remaining pressure gauge reaches 0.
Troubleshooting
Pump not starting:
- Ensure that the remote control plug is properly installed.
Pump Choke:
During a choke, you will see:
- The pressure gauge needle moves to the top and the end
- The material is not coming out of the pump
Step1: Immediately stop the pump.
Step2 : Reverse the pump to reduce the pressure until the pressure gauge reaches 0.
WARNINGS:
Never disconnect the hose when there is any pressure in the pressure gauge. Remove the remaining pressure by using the reverse function until the pressure gauge reaches 0.
Step3 : Remove the hose coupling
Step4 : Check the pump by pumping without the hose, if
1. The material comes out, the there is no problem with the pump.
2. The material does not come out, remove the rotor from the stator, clean thoroughly and reinstall.
Step 5 : Clean the hose by removing all the material residue, ensure that everything is out of the hose.
Step 6 : Reconnect the hose and resume operation.
Assembly & Disassembly
https://www.youtube.com/watch?v=M37Ly_2Lvmk
Maintenance
Links
Control, Operation, Cleaning & Troubleshooting https://www.youtube.com/watch?v=9-psV02YAlg
Downloads
User Manual:
https://drive.google.com/drive/u/0/folders/1Pn8fTXl6SLlbNm3qTAdDg95OrNsrwmP7
Spare parts list:
https://drive.google.com/drive/u/0/folders/1Pn8fTXl6SLlbNm3qTAdDg95OrNsrwmP7
