Difference between revisions of "Multicam Laser Cutter"
From Fab Lab Bcn WIKI
| Line 29: | Line 29: | ||
==Important commands== | ==Important commands== | ||
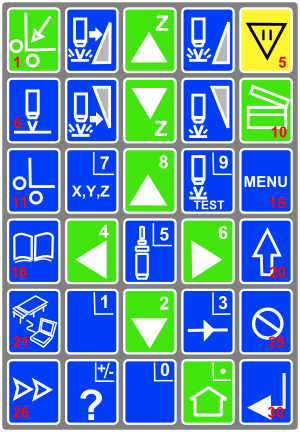
* 1.Shift home to home the machine when you turn everything on. SHIFT is button number 20 and HOME is button number 1. | * 1.Shift home to home the machine when you turn everything on. SHIFT is button number 20 and HOME is button number 1. | ||
| − | * 2. Set thickness of material and Z axis. By pressing button number 6 and ENTER (button number 30)we set the thickness of the material. | + | * 2. Set thickness of material and Z axis. By pressing button number 6 and ENTER (button number 30)we set the thickness of the material.The values are in millimeters. By constantly pressing button 0 we set the Z axis. |
| − | + | ||
* 3. Set home. Move the machine with buttons 2,4,6,8 and place it at the starting point you wish. By pressing button number 11 and ENTER(button number 30) set the 0,0 for your file. | * 3. Set home. Move the machine with buttons 2,4,6,8 and place it at the starting point you wish. By pressing button number 11 and ENTER(button number 30) set the 0,0 for your file. | ||
* 4. Set the speed and the power of the material you are going to cut. In MENU (button number 15) choose Params 2d and ENTER. set power and speed according to the table found in the wiki. | * 4. Set the speed and the power of the material you are going to cut. In MENU (button number 15) choose Params 2d and ENTER. set power and speed according to the table found in the wiki. | ||
| Line 37: | Line 36: | ||
* 7. Pause in case of accident. Button number 5. | * 7. Pause in case of accident. Button number 5. | ||
* 8. Restart by pressing Enter ( button number 30). | * 8. Restart by pressing Enter ( button number 30). | ||
| − | + | ||
| − | + | ||
==External links== | ==External links== | ||
*[http://www.fablabbcn.org/images/OTF_Sept2010.pdf Machine operation tutorial by Astrid Lubsen] | *[http://www.fablabbcn.org/images/OTF_Sept2010.pdf Machine operation tutorial by Astrid Lubsen] | ||
Revision as of 17:24, 6 December 2011
Contents
Technical specifications
- Technical specs here
CAM
- Cam here
Tools
- Tools here
Materials and configuration
<html> <iframe src="https://docs.google.com/document/pub?id=1gGGHfSNPin6maxehGrNYWDoeLwzZaBxSK3zMQG0JYoQ&embedded=true" width=900px height=600></iframe> </html>
Machine workflow
- Turn on the machine.
- Turn System to 'ON'.
- Turn Laser to 'ON'.
- Turn Shutter to 'OPEN'.
- Turn Mode to 'RUN'.
- Turn on the fume extraction.
- Fume collector to 'ON'.
- Turn on the the main compressor (main switch on the front wall of the lab, small box with two smal blue caps).
Important commands
- 1.Shift home to home the machine when you turn everything on. SHIFT is button number 20 and HOME is button number 1.
- 2. Set thickness of material and Z axis. By pressing button number 6 and ENTER (button number 30)we set the thickness of the material.The values are in millimeters. By constantly pressing button 0 we set the Z axis.
- 3. Set home. Move the machine with buttons 2,4,6,8 and place it at the starting point you wish. By pressing button number 11 and ENTER(button number 30) set the 0,0 for your file.
- 4. Set the speed and the power of the material you are going to cut. In MENU (button number 15) choose Params 2d and ENTER. set power and speed according to the table found in the wiki.
- 5. Load your file. By pressing button number 16 you will enter in your hosts files. Browse your file and choose by pressing ENTER.(button number 30)
- 6. Start the job. By pressing button number 10 two times.
- 7. Pause in case of accident. Button number 5.
- 8. Restart by pressing Enter ( button number 30).
