Difference between revisions of "3D PRINTING WITH ROBOTS"
| Line 1: | Line 1: | ||
| − | [[Category: | + | [[Category:Machines]] |
| + | |||
| + | [[File:4_End effector catalogue_FL_Kopie.jpg| thumb | End effector catalogue FL Kopie)]] | ||
==Material Preparation== | ==Material Preparation== | ||
| − | + | Testing material viscosity and printability before 3D printing with a robot is indeed a prudent step to ensure successful printing outcomes. Here's a breakdown of the recommended process: | |
| + | |||
| + | |||
| + | '''Manual Extrusion Test with a Closed Tube Mortar Gun:''' | ||
| + | |||
| + | - Use a closed tube mortar gun to manually extrude the material. | ||
| − | + | - This allows you to assess how the material flows and how it behaves during extrusion. | |
| − | + | - The closed tube design helps in maintaining consistent pressure and control over the extrusion process. | |
| − | + | ||
| − | + | '''Mixing the Material:''' | |
| − | + | ||
| − | + | ||
| − | + | - Ensure thorough mixing of the material to achieve homogeneity. | |
| − | + | - Inadequate mixing can result in inconsistencies in material properties, affecting print quality. | |
| − | + | ||
| − | + | ||
| − | + | ||
| − | + | - Avoid adding excessive water content, as it can cause shrinkage issues during printing. | |
| − | + | ||
| − | + | ||
| − | + | - Conversely, too little water content can lead to dry material, making it difficult to print. | |
| − | |||
| − | |||
| − | Machine | + | ==Machine Views== |
| − | + | ||
| − | + | [[File:View.jpg| 700 × 402 pixels]]<br><br> | |
| − | |||
| − | + | 1- Motor | |
| − | + | 2- Control system: Frequency converter with switch | |
| − | + | elements, power supply inlet plug with undervoltage | |
| + | release to prevent re-start in case of voltage interuption | ||
| − | + | 3- Hopper for wet premixed material | |
| − | + | 4- Housing with polyurethan inlet | |
| − | + | 5- Worm pump | |
| − | + | 6- Pump outlet with pressure gauge | |
| − | + | ==Operating the machine== | |
| − | |||
| − | + | '''Connections Before Start-Up''' | |
| − | + | Connect the main power plug to the control cabinet | |
| + | with the cable to the construction 230V/1/N/PE/50Hz | ||
| + | (3x1,5mm2). | ||
| − | + | Make sure that all cables and safety devices are functioning properly. | |
| − | + | '''Start-up in manual mode''' | |
| − | + | - Before Operating the machine check the machine state. Switch rightwards for manual mode. | |
| − | [[File: | + | [[File:2_MAI_2PUMP_PICTOR_3D_B_Kopie.jpg| 700 × 402 pixels]]<br><br> |
| − | |||
| − | 1 | + | - '''Step 1:''' Turn on the main switch |
| − | + | [[File:Onn_n_off_switch.jpg| 700 × 402 pixels]]<br><br> | |
| − | |||
| − | + | - '''Step 2:''' Fill the material-hopper with wet premixed material. | |
| − | + | - '''Step 3:''' Turn the Forward/Reverse Switch to FWD (Start the machine by turning the mode switch from | |
| + | 0 to FWD) | ||
| − | [[File: | + | [[File:Speed_controlle.jpg| 700 × 402 pixels]]<br><br> |
| − | |||
| − | + | - '''Step 4:''' Turn the Speed control to the desired speed | |
| − | |||
| − | + | '''Stopping the pump:''' | |
| − | + | - '''Step 1:''' Turn the Forward/Reverse control to 0 | |
| − | + | - '''Step 2:''' Turn off the main switch | |
| − | + | ==Termination of work and cleaning== | |
| − | + | After work is completed or in the event of longer inter- | |
| + | ruptions, run the machine until the material hopper is empty. | ||
| − | |||
| − | + | '''Step 1:''' Wash the hopper with clean water, rub the hopper with the sponge provided if it is necessary | |
| − | + | ||
| − | + | '''Important:''' | |
| − | + | Never use any cutter or any sharp/rough tools to clean the hopper, always use the rubber tool that is provided. | |
| − | 3 | + | '''Step 3:''' Soak a sponge ball in water. |
| − | + | '''Warning!''' | |
| − | + | Never disconnect the hose when there is any pressure in the pressure gauge. Remove the remaining pressure gauge reaches 0. | |
| − | |||
| − | + | '''Step 4:''' Open the hose coupling, insert the sponge ball into the hose. | |
| − | + | '''Step 5:''' Reconnect the hose coupling | |
| − | + | ||
| − | + | '''Step 6:''' Start pumping and wait for the sponge ball to come out of the hose. | |
| − | + | '''Step 7:''' Grease the pump after cleaning to ensure the pump gasket is residue free. | |
| − | + | '''Step 8:''' Ensure that the grease is pushed out of the pump gasket. | |
| − | + | '''Warning!''' | |
| − | + | Never disconnect the hose when there is any pressure in the pressure gauge. Remove the remaining pressure gauge reaches 0. | |
| − | + | ||
| − | |||
| − | + | If the machine is not required for a longer period, dismantle the rotor | |
| + | and stator and lubricate them with | ||
| + | slide spray. Reassemble the | ||
| + | components and put them into the | ||
| + | machine again. | ||
| − | + | ==Troubleshooting== | |
| − | + | '''Pump not starting:''' | |
| − | + | - Ensure that the remote control plug is properly installed. | |
| − | + | [[File:Troubleshoot.jpg| 700 × 402 pixels]]<br><br> | |
Revision as of 14:57, 28 January 2024
Contents
Material Preparation
Testing material viscosity and printability before 3D printing with a robot is indeed a prudent step to ensure successful printing outcomes. Here's a breakdown of the recommended process:
Manual Extrusion Test with a Closed Tube Mortar Gun:
- Use a closed tube mortar gun to manually extrude the material.
- This allows you to assess how the material flows and how it behaves during extrusion.
- The closed tube design helps in maintaining consistent pressure and control over the extrusion process.
Mixing the Material:
- Ensure thorough mixing of the material to achieve homogeneity.
- Inadequate mixing can result in inconsistencies in material properties, affecting print quality.
- Avoid adding excessive water content, as it can cause shrinkage issues during printing.
- Conversely, too little water content can lead to dry material, making it difficult to print.
Machine Views
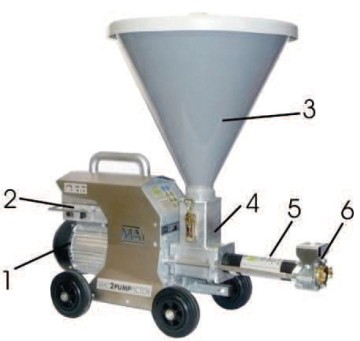
1- Motor
2- Control system: Frequency converter with switch elements, power supply inlet plug with undervoltage release to prevent re-start in case of voltage interuption
3- Hopper for wet premixed material
4- Housing with polyurethan inlet
5- Worm pump
6- Pump outlet with pressure gauge
Operating the machine
Connections Before Start-Up
Connect the main power plug to the control cabinet with the cable to the construction 230V/1/N/PE/50Hz (3x1,5mm2).
Make sure that all cables and safety devices are functioning properly.
Start-up in manual mode
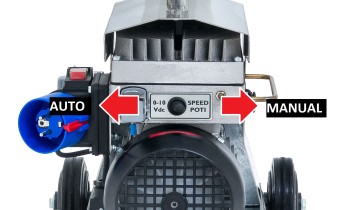
- Before Operating the machine check the machine state. Switch rightwards for manual mode.
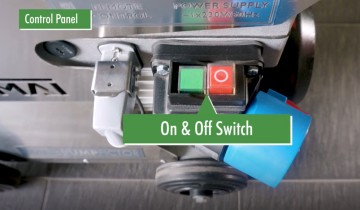
- Step 1: Turn on the main switch
- Step 2: Fill the material-hopper with wet premixed material.
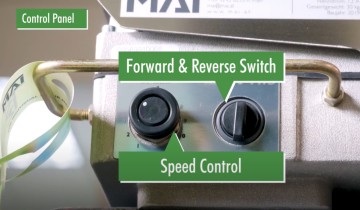
- Step 3: Turn the Forward/Reverse Switch to FWD (Start the machine by turning the mode switch from 0 to FWD)
- Step 4: Turn the Speed control to the desired speed
Stopping the pump:
- Step 1: Turn the Forward/Reverse control to 0
- Step 2: Turn off the main switch
Termination of work and cleaning
After work is completed or in the event of longer inter- ruptions, run the machine until the material hopper is empty.
Step 1: Wash the hopper with clean water, rub the hopper with the sponge provided if it is necessary
Important:
Never use any cutter or any sharp/rough tools to clean the hopper, always use the rubber tool that is provided.
Step 3: Soak a sponge ball in water.
Warning!
Never disconnect the hose when there is any pressure in the pressure gauge. Remove the remaining pressure gauge reaches 0.
Step 4: Open the hose coupling, insert the sponge ball into the hose.
Step 5: Reconnect the hose coupling
Step 6: Start pumping and wait for the sponge ball to come out of the hose.
Step 7: Grease the pump after cleaning to ensure the pump gasket is residue free.
Step 8: Ensure that the grease is pushed out of the pump gasket.
Warning!
Never disconnect the hose when there is any pressure in the pressure gauge. Remove the remaining pressure gauge reaches 0.
If the machine is not required for a longer period, dismantle the rotor
and stator and lubricate them with
slide spray. Reassemble the
components and put them into the
machine again.
Troubleshooting
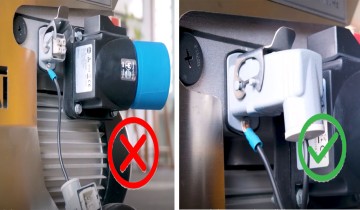
Pump not starting:
- Ensure that the remote control plug is properly installed.
