Difference between revisions of "Troteclaser"
From Fab Lab Bcn WIKI
(→The lengths) |
|||
| Line 20: | Line 20: | ||
====Geometry==== | ====Geometry==== | ||
<br> | <br> | ||
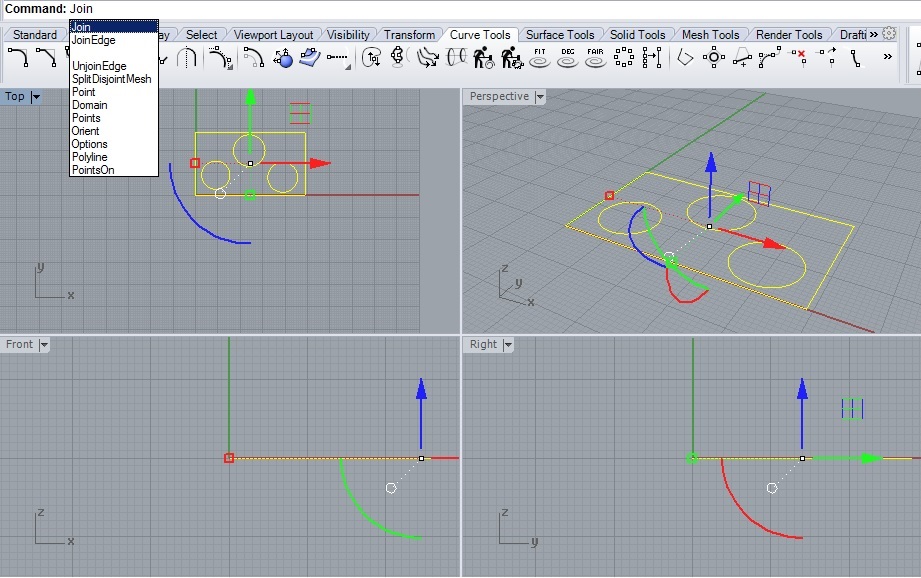
| − | *Join the geometry | + | * Join the geometry |
[[File:Join.jpg| 700 × 402 pixels]]<br><br> | [[File:Join.jpg| 700 × 402 pixels]]<br><br> | ||
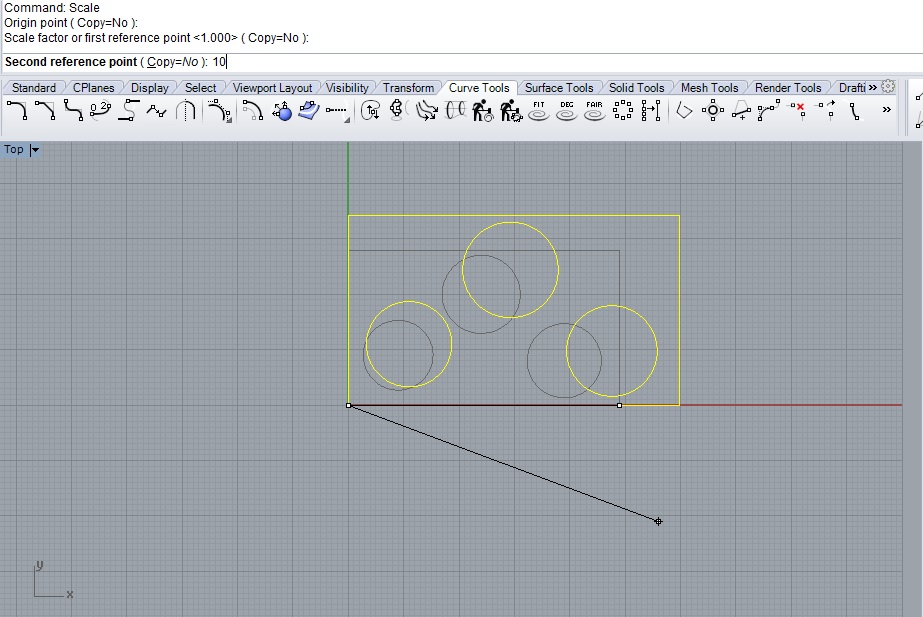
| − | *Check the scale of the drawing , make sure you are in millimeters and that your material fits in the laser. | + | * Check the scale of the drawing , make sure you are in millimeters and that your material fits in the laser. |
[[File:Scale.jpg| 700 × 402 pixels]]<br><br> | [[File:Scale.jpg| 700 × 402 pixels]]<br><br> | ||
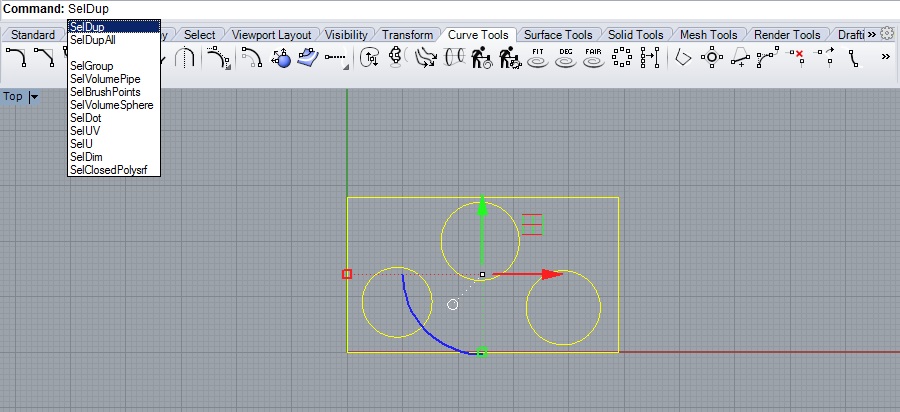
| − | *Seldup command selects duplicate lines. Keep in mind that is there are more than one lines the laser cutter will pass more times over the same place. | + | * Seldup command selects duplicate lines. Keep in mind that is there are more than one lines the laser cutter will pass more times over the same place. |
[[File:3SelDup.jpg| 700 × 402 pixels]]<br><br> | [[File:3SelDup.jpg| 700 × 402 pixels]]<br><br> | ||
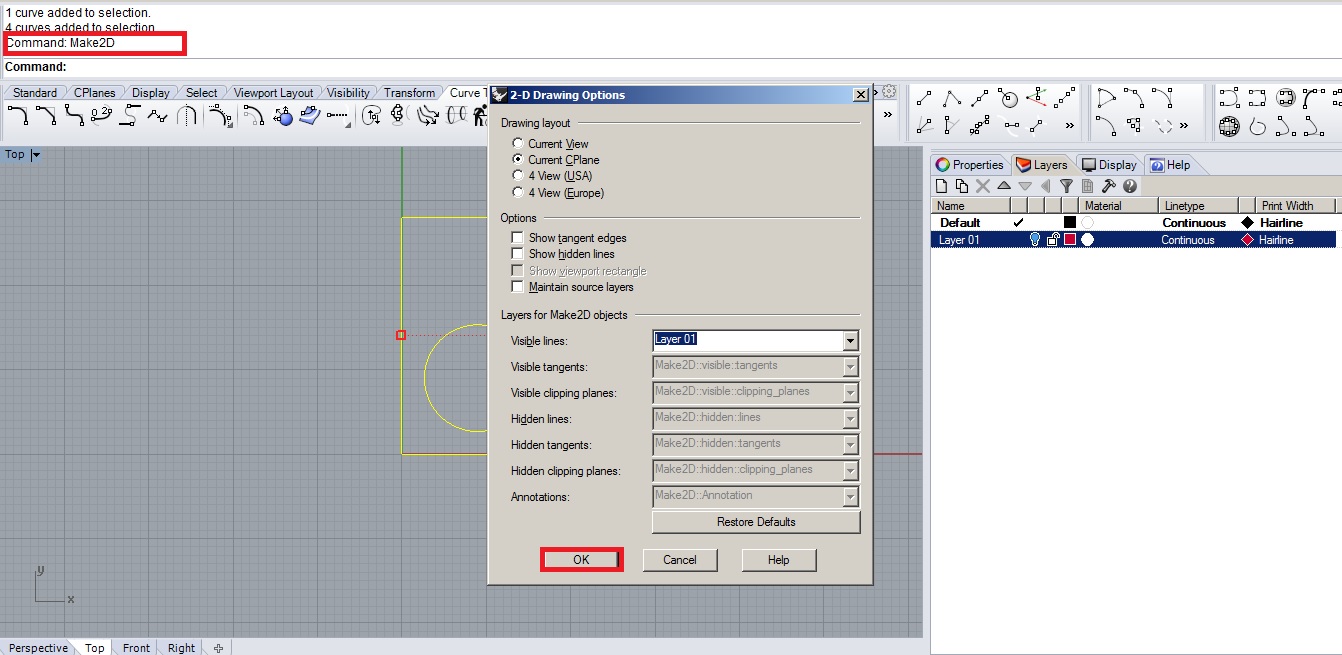
| − | *Make2d if you import your drawing from other programs other than rhino and to make sure that everything is on 0 in Z plane. | + | * Make2d if you import your drawing from other programs other than rhino and to make sure that everything is on 0 in Z plane. |
[[File:4Make2D.jpg| 700 × 402 pixels]]<br><br> | [[File:4Make2D.jpg| 700 × 402 pixels]]<br><br> | ||
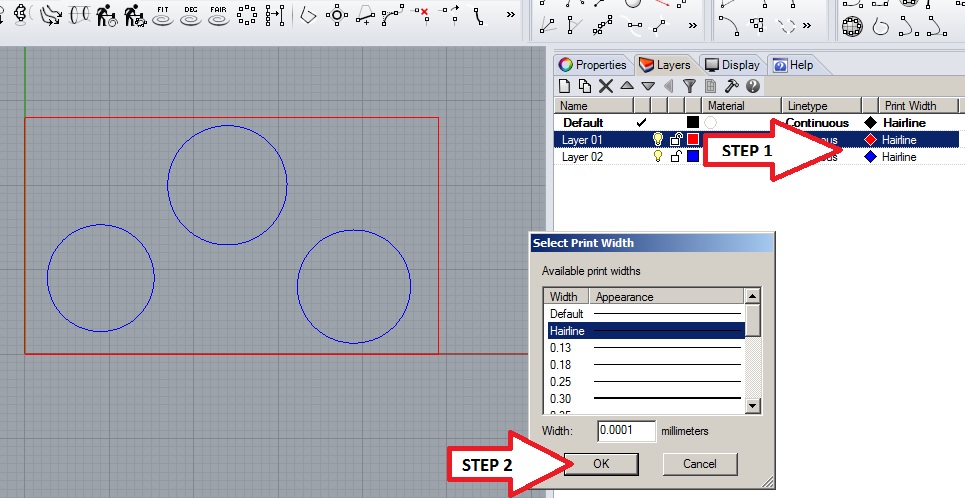
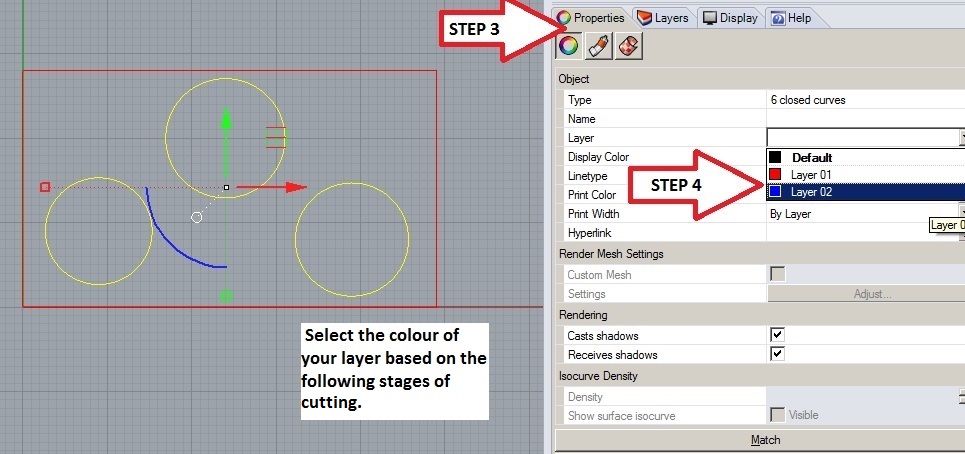
| − | *Change object layer : hairline | + | * Change object layer : hairline |
[[File:Hairline.jpg| 500 × 202 pixels]]<br><br> | [[File:Hairline.jpg| 500 × 202 pixels]]<br><br> | ||
[[File:4LayersColour.jpg| 700 × 402 pixels]]<br><br> | [[File:4LayersColour.jpg| 700 × 402 pixels]]<br><br> | ||
| Line 40: | Line 40: | ||
====Printing==== | ====Printing==== | ||
<br> | <br> | ||
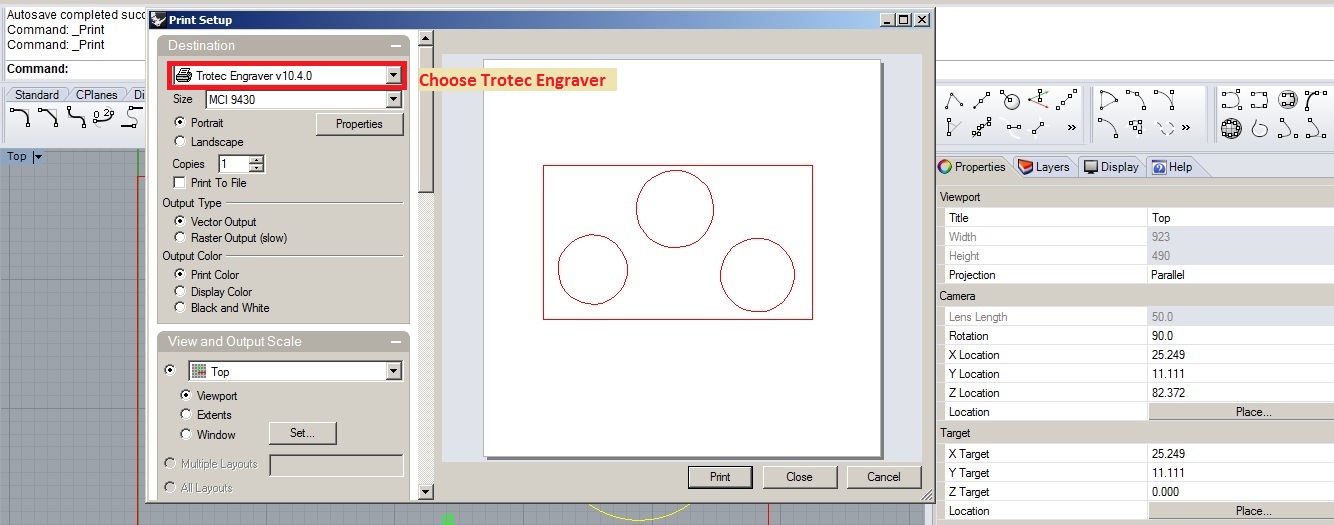
| − | *Ctrl+p : Print | + | * Ctrl+p : Print |
[[File:4WindowPrint.jpg| 4WindowsPrint ]]<br><br> | [[File:4WindowPrint.jpg| 4WindowsPrint ]]<br><br> | ||
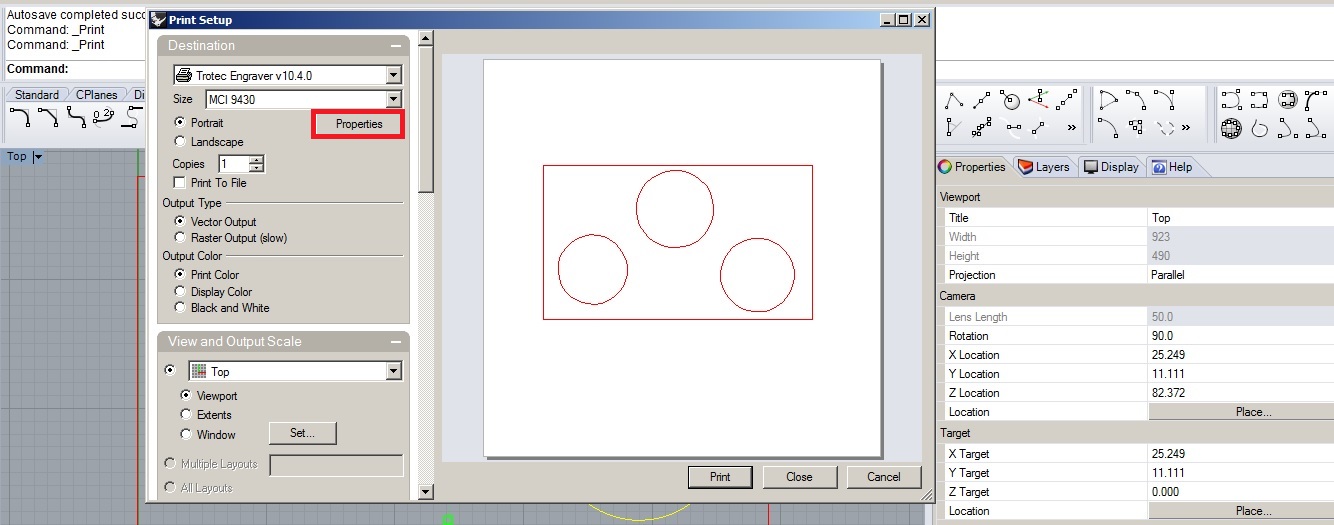
| − | *Properties | + | * Properties |
[[File:5Print.jpg| 700 × 402 pixels]]<br><br> | [[File:5Print.jpg| 700 × 402 pixels]]<br><br> | ||
[[File:5Preference.jpg| 700 × 402 pixels]]<br><br> | [[File:5Preference.jpg| 700 × 402 pixels]]<br><br> | ||
| − | *Material Database | + | * Material Database |
[[File:5MaterialDataBase.jpg|Material]]<br><br> | [[File:5MaterialDataBase.jpg|Material]]<br><br> | ||
*Process options | *Process options | ||
[[File:5Process options.jpg|Process options]]<br><br> | [[File:5Process options.jpg|Process options]]<br><br> | ||
[[File:5Valid.jpg|Valid]]<br><br> | [[File:5Valid.jpg|Valid]]<br><br> | ||
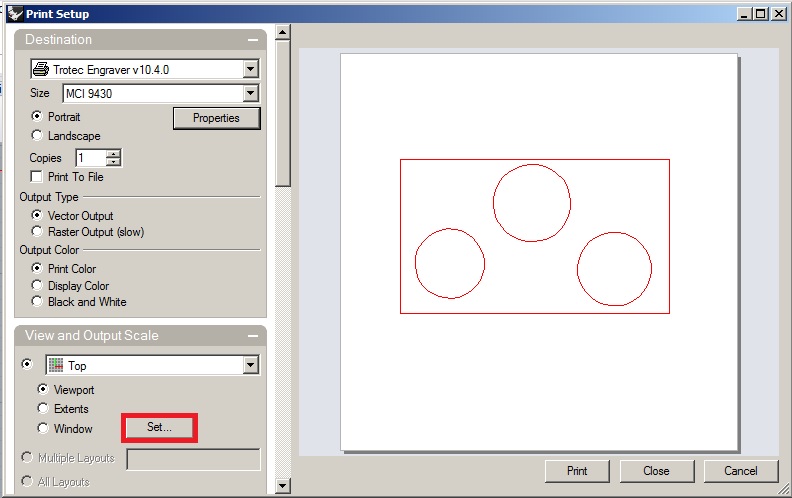
| − | *Set the view | + | * Set the view |
[[File:Settheview.jpg|Set the view]]<br><br> | [[File:Settheview.jpg|Set the view]]<br><br> | ||
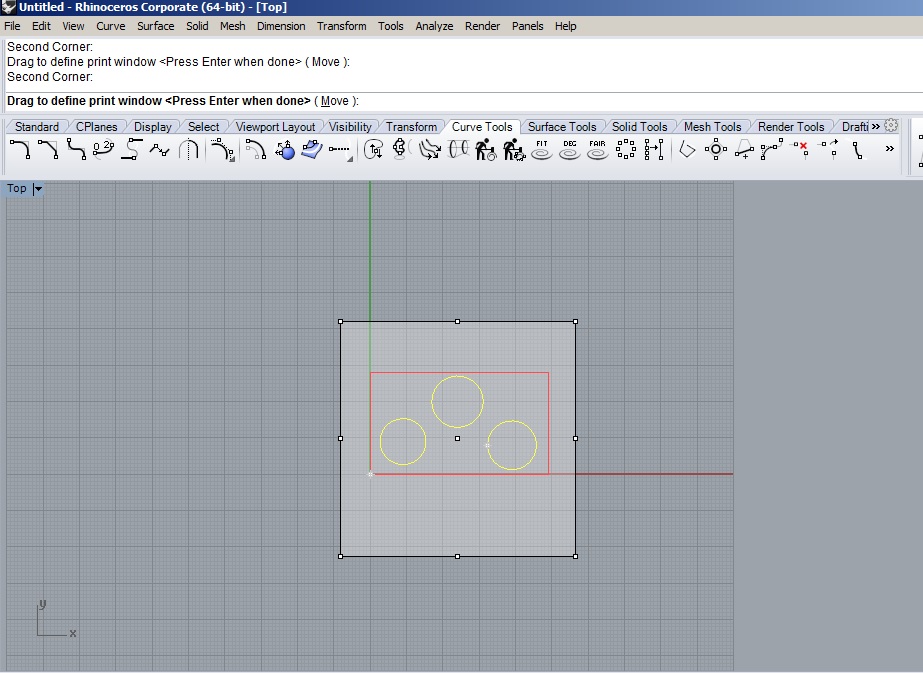
| − | *Drag the square to define your print window | + | * Drag the square to define your print window |
[[File:PrintWindow.jpg|Print Window]]<br><br> | [[File:PrintWindow.jpg|Print Window]]<br><br> | ||
| − | *Clic on print | + | * Clic on print |
===Job control=== | ===Job control=== | ||
<br> | <br> | ||
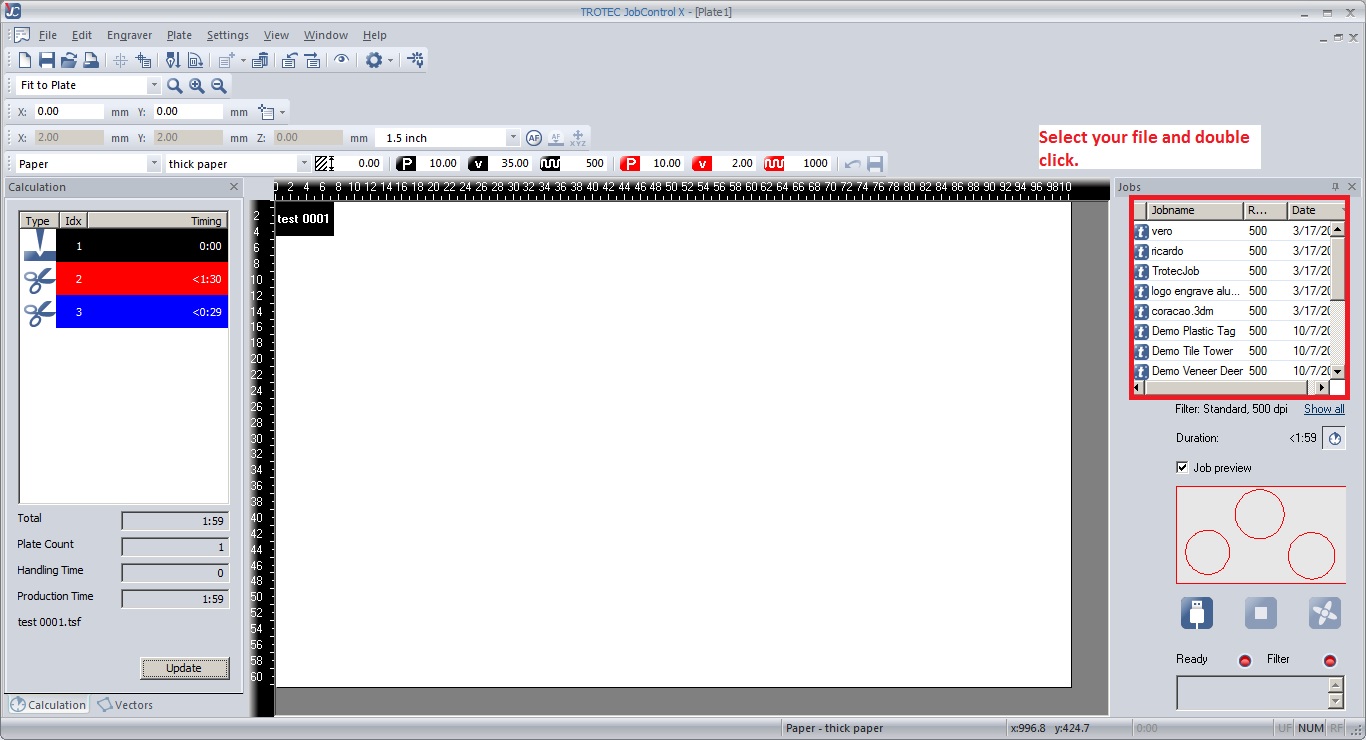
| − | *Selection of your file | + | * Selection of your file |
[[File:Selection.jpg|Selection]]<br><br> | [[File:Selection.jpg|Selection]]<br><br> | ||
| − | + | <br><br><br><br> | |
==The Machine== | ==The Machine== | ||
| Line 111: | Line 111: | ||
| Compress Air | | Compress Air | ||
|} | |} | ||
| + | |||
| + | ===Turn on the machine=== | ||
| + | * Turn the key. | ||
| + | * Clean and insert the lens in the laser head : the curved portion above. | ||
| + | * Move the head with the arrows on the machine. | ||
| + | * Use the focus for positionning the table. | ||
| + | * When the lid is closed, a light flashes at a reduced frequency. | ||
| + | * On "Job control", connect the machine and align your document with the target thanks the following commands : | ||
| + | [[File:7tool.jpg|tool]]<br><br> | ||
Revision as of 17:32, 20 March 2015
Contents
Precaution
- Never leave the laser device unattended while the system is operating.
- Always have a fire extinguisher available, as the laser beam can ignite flammable materials.
- Do not put any flammanle materials in the inside of the device or in the immediate surroundings of the device.
- Be aware of all Laser safety stickers on the machine and follow them.
- The system must be used only by authorized and trained personnel.
- Avoid electrostatic charging during cable connections / plug-in.
- Do not start the Laser machine without an adequate exhaust system.
- In case of a broken lens: avoid direct skin contact and inhaling.
- "EMERGENCY-STOP": on any risk: LIFT THE COVER LID!
Procedures on the softwares
Rhino
Geometry
- Join the geometry
- Check the scale of the drawing , make sure you are in millimeters and that your material fits in the laser.
- Seldup command selects duplicate lines. Keep in mind that is there are more than one lines the laser cutter will pass more times over the same place.
- Make2d if you import your drawing from other programs other than rhino and to make sure that everything is on 0 in Z plane.
- Change object layer : hairline
Engrave Cut Cut Cut Cut Cut Cut Cut Cut Cut Cut Cut Cut Cut Cut Cut Cut Cut Cut |
Printing
- Ctrl+p : Print
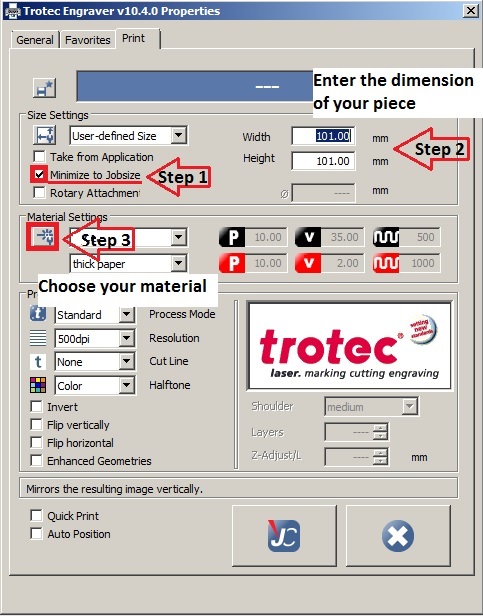
- Properties
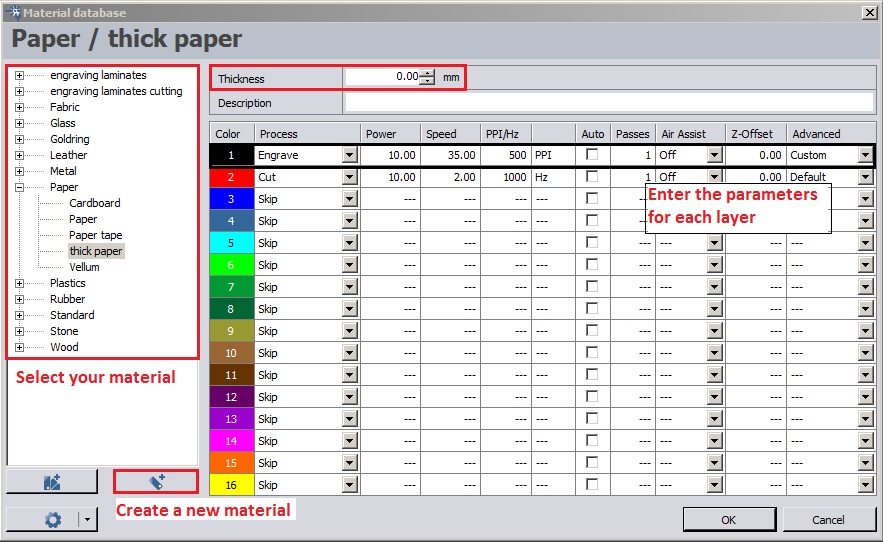
- Material Database
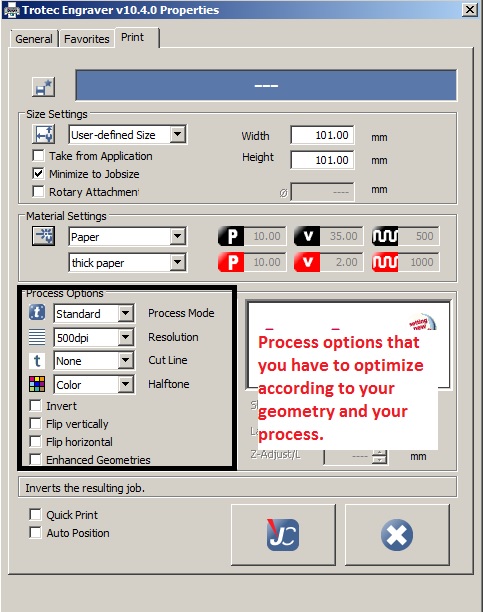
- Process options
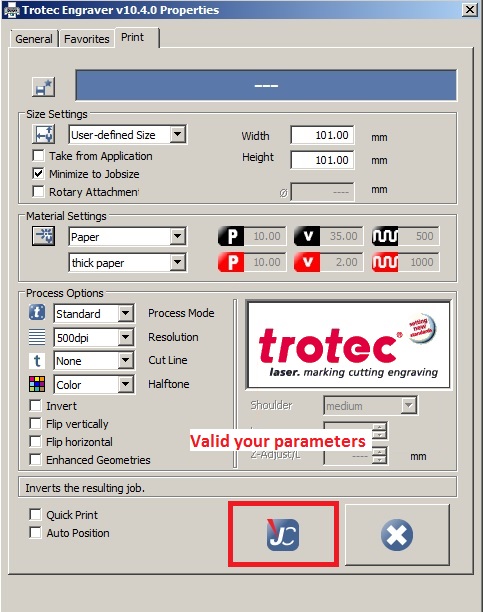
- Set the view
- Drag the square to define your print window
- Clic on print
Job control
- Selection of your file
The Machine
Accessories
- Focus Tool
- Cone
- Allen Key set 1.5 - 10mm
- 2 Wrenches
- Lens cleaning tissues
- Optics cleaning tissues
- AC power cord
The lens
| Colours | Focal (mm) | Thickness material Used |
|---|---|---|
| Red | 1.5 | Very fine |
| Black | 2 | Used mainly |
| Pink | 2.5 | Thick |
Cleaning optics
- Do not touch directly the lens during the operation.
- Pour on it a drop of the specific product : "Lens clens".
- Clean it with the appropriate electrostatic tissues : "Edmund Industrial Optic".
Vacuum
| Accrylic | Not Compress Air |
| Rubber | Compress Air |
| Wood | Compress Air |
Turn on the machine
- Turn the key.
- Clean and insert the lens in the laser head : the curved portion above.
- Move the head with the arrows on the machine.
- Use the focus for positionning the table.
- When the lid is closed, a light flashes at a reduced frequency.
- On "Job control", connect the machine and align your document with the target thanks the following commands :
